

- 1 1/2 cups of paint
- 1/2 cup Plaster of Paris
- 1/2 cup of water
 |
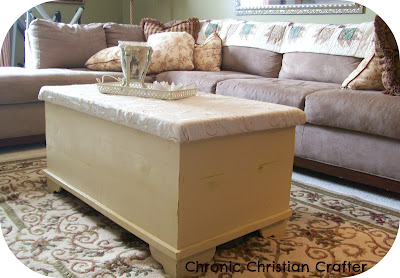
| Close up view of distressing…while I was wanting a “distressed” look, I did not want a heavy distressing. |
- Paint color of choice (I used the rest of a paint from a former project)
- Plaster of Paris (for this homemade chalk paint recipe…some recipes call for different materials)
- Dropcloth
- Sandpaper
- Wax (I used Minwax Paste Finishing Wax)
- Cheesecloth (Or…clean cloths to apply wax and to buff the wax off)
- Paintbrush
- Container (to hold homemade chalk paint mixture)
- Paint stirrer
- Foam
- Adhesive spray
- Fabric of choice
- Heavy duty stapler and staples

Following along from the collage picture above, here are the steps:
- Since prep (like sanding or priming) isn’t needed, I began painting my first thin layer of paint after mixing paint with the ingredients (i.e. Plaster of Paris, water) as noted above. The paint dries fast…as soon as I got finished with one coat, it was ready for the next. I ended up painting 3 coats on my cedar chest. While it might not have required this many coats, I was pleased with 3…it is all personal preference and the look that you’re trying to achieve.
- After I applied all of the coats and they were completely dry, then comes the fun part…sanding!! This is actually quite laborsome, and I purposely chose to not heavily distress this piece…however, you can see in some of the close up picture(s) how the paint distresses with sanding. (This is my primary and favorite quality of this paint).
- Once I was happy with the distressing…I took a break! (I also had a very sweet helper, my husband, help with most of the sanding…) Next is waxing and buffing in order to protect the hard work. I used Minwax Finishing Wax. I simply applied with a clean cloth and allowed about 15 minutes for it to dry. Once the wax was dry to touch, I took a piece of cheese cloth, and I buffed the wax off. This will make the distressed areas pop (especially where wood is “peeking” through) even better, as well as adding protection to the painted project.
- Next, I added upholstery and padding to the top of my chest. I purchased several 1″ thick foam squares from Hobby Lobby. I measured and arranged them to ensure the correct fit on top of the lid to the cedar chest first. Some had to be cut/trimmed to fit the lid. Once all of the foam was arranged to fit the lid of the chest. After all of the foam was cut and arranged to fit correctly on the lid of the cedar chest, I sprayed adhesive on the chest and the back of the foam one by one (working fast as this stuff works and sets up fast). (This took mere minutes…)
- The final step is to upholster the top of the cedar chest with fabric. In order to make the upholstery of the fabric easier…I unscrewed the lid from the chest base and worked on the upholstery separately from the base of the cedar chest. I used my heavy duty stapler and stapled the fabric to the bottom of the chest lid (pulling the fabric tight on each side, beginning in the middle of each side, and working out). I treated the corners as one would a Christmas present. Once finished, I attached the lid back to the base of the chest…

Above is a look back at the before and after. Isn’t it quite the difference? To accessorize, I just added a tray (that I updated as well), with a few accessories on it, and that is all that I plan to add. You can check out the tutorial on how I updated the tray as well as other tutorials on my blog here. So, now that we are about to wrap up the summer…were you able to accomplish any big “to do” items off of your list? Do you have any big projects on your “to do” list that you plan to tackle soon? (I still have several! Seems like the list never shortens…just continues to grow longer!) What about homemade chalk paint…have you tried it out on some of your furniture/decor items…were you pleased with your experience?
Once again, I want to thank Barbara for allowing me to share with you today. If you enjoyed or were blessed by what you read in this post, I would love for you to subscribe and follow me at Chronic Christian Crafter. You can follow and contact me via any of the following:


 Blessings,
Jill @ Create.Craft.Love. says
Erin – what a magnificent upcycle! I love how it turned out! Great tutorial!
Erin @ Chronic Christian Crafter says
Thanks Jill.
Erin
Barbara Hiatt says
Thanks so much for guesting Erin!! I love this project!