After living in this house almost 3 years, we finally did it. We FINALLY got around to working on our master bedroom. We’d been sleeping in a catch-all room that housed not only our bed, but everything that we didn’t quite know what to do with. Isn’t that the case for most families though? We move in, paint the living areas, bathrooms, update kitchens, patios, kid’s rooms, etc. and forget all about our own sanctuaries, the master bedroom! So we had a garage sale to get rid of most of the excess ‘stuff’, and began making our sanctuary, starting with a Board and Batten Grid Wall.
Board and Batten Grid Wall
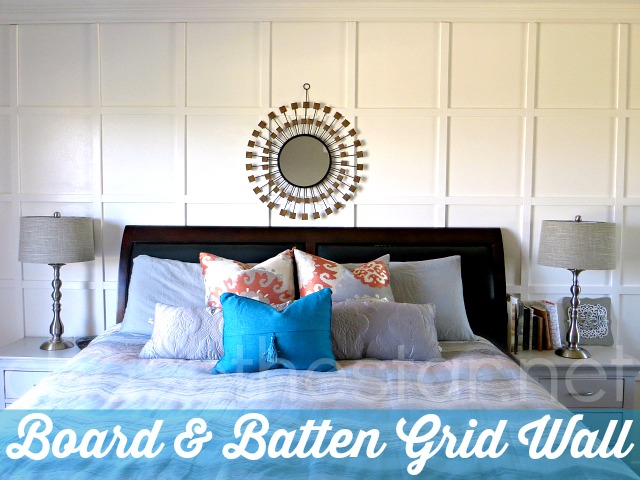
It was quite simple to add this fun architectural detail to an otherwise bland built-in-the-80’s-room.
We gathered our materials and got started {I am not listing all of the materials here in exact measurements because every space is different. If you are attempting this project then be sure to measure your wall across and top to bottom}.
I almost forgot to take a ‘before’ pic, but I captured this shot right after we started working.

We painted the room a dark denim blue (Neptune by Behr) when we moved in, in an attempt to cover up the disastrous walls the previous owners left us. Clearly this backfired on us as we did nothing else to the room for nearly 36 months.
Materials:
For the boards: Molding in the size and material you like:
Most home improvement stores will offer a large variety in either MDF or pine. MDF is definitely the least expensive option, and after paint looks just as good. We wanted our grid to have 2’x2′ ‘squares’ so we measured and bought the boards accordingly.
For Crown Molding: This is obviously optional, but we chose a standard MDF pack that contained enough to cover our entire room, for about $50.
Please be sure to purchase pre-primed boards (the white ones). You will thank me later!
Jig Saw:
We used our Ryobi saw to make all of our cuts, including the angle cuts.
Nail Gun and Air Compressor:
In our last board and batten project we did it the long way. We drilled holes into each board, and manually hammered the nails in. Not only did we damage some of the boards with the hammer causing more work later, but it added a whole bunch of time to the project! This time we bit the bullet and took advantage of a sale at Home Depot and picked up a nail gun and air compressor. Best decision EVER! If you can’t purchase one right now, borrow or barter. I promise you’ll be glad you did!
Paint:
1 gallon of primer, and 1 gallon of paint. The color I went with is Polar Bear by Behr in a satin finish. Loved the brilliant and crisp white!
Other Materials:
Level
Painting supplies
Wood filler, spatula
Sanding block
Directions:
Step 1:
Before doing anything at all, you will need to prep, prime, and paint. If you are adding crown molding then you will only need to prime and paint until about an inch under the ceiling. Be sure to protect the rest of the edges with painter’s tape. Add a coat of primer all over the wall, and allow to dry. Add a coat of white and allow to dry completely.
Note: You can skip the primer if your wall is a pale color to begin with. In our case the wall was dark blue so primer was a must. We also needed 2 coats of the paint.
Step 2:
Add the crown molding. Cut the ends to the size you need for your wall with your jig saw, at a 45° angle. Hold it in place and secure it with your nail gun.

Step 2:
Measure, measure, and measure again.
We measured vertically first and marked every 2′.

Step 3:
The boards will need to be cut at a 45° degree angle on either end, then nailed into the wall on the markings you made in step 2.


Note: You will feel super powerful after getting the hang of the nail gun. Just a bonus!
Step 4:
Time to add the horizontal boards. Cut straight ends using the jig saw, in our case our boards were 2′ each. Make sure each piece is leveled and perfectly aligned with the piece next to it, nail them in. This step may take a separate set of eyes to get just right :)
Continue all the way across the wall.
Very important: Measure each board before cutting, in case your walls are uneven like mine are!


Step 5:
Patch the nail holes with filler. Be sure to use wood filler, regular spackle won’t work well on wood.


Bonus Points: Get a super cute assistant to help.
Step 6:
After the wood filler has set, go over each hole with the sanding block. Not fun, but necessary.
Step 7:
Wipe off the dust (I used my vacuum attachment to get the hard to reach spots), then go over the wall and boards with a coat of paint. Let it dry completely. Admire your work—you’re done!


We’re still decorating the rest of the room. So far the walls are painted in a pretty tan shade, and as you see some accessories have made their way in there as well. I am excited to accessorize the walls and the rest of the furniture. It’s slowly coming together—FINALLY!
I used to keep my bedroom door shut tight. Now that there is a pretty focal wall to show off, I’m leaving the door wide open!
With a few good tools and a great eye, you can do anything you can dream up!
What do you think? What space would you add a Board and Batten Grid wall to?
Crystal says
Love the batten grid wall. Looks amazing!!