Hello! I’m Cheryl and I blog over at That’s What {Che} Said… I am so excited to be setting up camp today over here at Chase The Star! Barbara is one of my bloggy BFF’s and I am so happy she asked me over today! Let me introduce myself, I am an engineer by degree but have since turned stay at home mom with a side gig of this whole creative blogging thing! I am loving the career change! I will take paint and kiddos over steel-toed boots and hardhats any day!

I share a ton of DIY Projects, Crafts, Recipes, Kid’s Activities and so much more! My door is always open if you want to stop by! Make sure to say Hi and let me know you are over from Chase the Star!
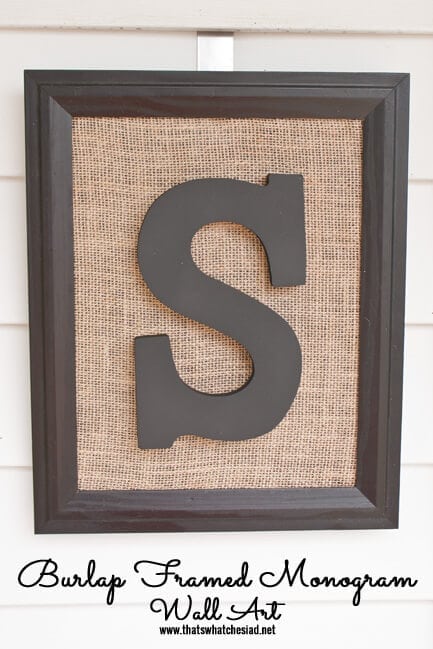
I love to change up the décor in my home and I also love it to be personal. Today I wanted to share with you a versatile framed monogrammed project that will give you both the option to change it out and make it truly YOURS!
We will need:
- 11 x 14 Frame ($5 at my local Wal-Mart)
- Wooden Letter of your choice
- Spray-paint to match your frame if the letter does not already
- Elmer’s Spray Adhesive
- 3M Command Hooks (small ones)
- burlap or other fabric
- Scissors

I started off by disassembling my frame. You won’t need the glass pane. Just keep it for another project!
1. I located the nail hole on the wooden letter 2. I got out my 3M command hook and I lined the hook up with the nail notch on the back of the letter. 3. I positioned it on my insert and then 4. I pressed the letter and hook down.

Remove the letter leaving the hook behind. This is where your letter will hang once we finish the next steps.

Next I gave my white wooden “S” a few coats of black spray paint. I love Krylon Dual because it coats awesome! (I picked up my Letter S at Michaels and used a coupon and it was only $2.)

While that letter is drying I cut a section of burlap that covered the frame insert. I centered it up and then I poked the hook we just mounted on the insert through a space in the burlap. If you are using fabric just make a small cut with some scissors.

Next I sprayed the insert with some spray adhesive and then stuck the burlap down and trimmed the edges flush with the insert. Add the burlap insert back into the frame. 
When your letter is dry, hang your Letter on the command hook. Now your wall art is complete!
Some ideas to change this out: Add pink or red fabric and a heart for Valentine’s day or replace with holiday fabric for Christmas! The craft stores are now offering tons of laser cut wooden shapes these days as well! this would also be a great gift for a wedding shower or as a housewarming party gift!
Thank you so much for creating with me today! I’d love for you to stop by and get my BEST tip to EASILY remove labels from jars or to check out my delicious Crock Pot Buffalo Chicken Dip Recipe or if you are needing some convenience, how about some DIY Mason Jar Straw Lids? If you are the crafting type…you may or may not want to stop by today because there may or may not be a Silhouette Cameo Giveaway going on at my place! {Eeee! }
lesley says
adorable….would be so cute in pastels with fabric behind for baby’s room, etc.
Cheryl @ That's What Che Said... says
Thanks Lesley! That would be adorable for a baby’s room!
Dinah says
Fun idea! You hit two of my craft faves… burlap and monograms! LOVE!
Cheryl @ That's What Che Said... says
Thanks Dinah! They are two of my favorites too! Great minds! :)
Crystal says
Love the monogram!! My daughter just gave me some burlap she had leftover from a project. I know what I’m doing with it!! Thanks for the great tutorial!!
Cheryl @ That's What Che Said... says
Thanks Crystal! It’s so easy to make you can whip it up in no time!
Pop Art Minis - Joni says
Very cute idea! Tweeted too!
Cheryl @ That's What Che Said... says
Thanks so much! It is appreciated!!
Barbara @ Chase the Star says
Thanks Joni!