Sponsored by Online Fabric Store.
Hey there! How’s your Christmas shopping going? I’ll be honest, I am NOT going to the stores this year. I’ve done most of my shopping from the comfort of my living room, comfy slippers and all! That’s a great option for most gifts, but there are some that will require a little more of a personal touch. Since my youngest is in kindergarten we’re making his teacher a fun Christmas present, and will top it off with a handmade, DIY Fabric Gift Tag.
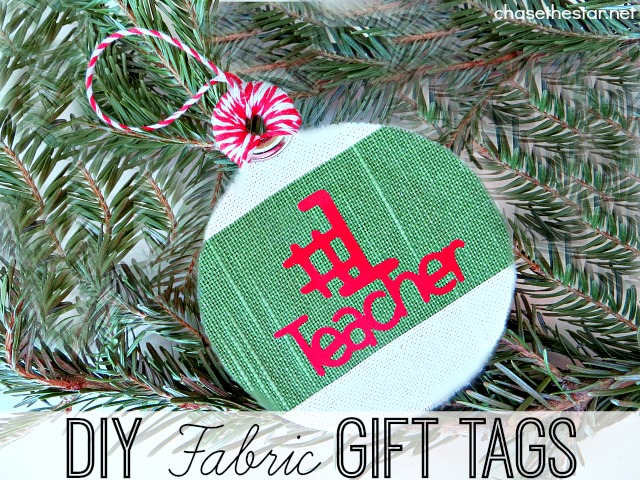
These were so easy! This beautiful green and white striped fabric is called Coastal Green from Online Fabric Store, where you will fall.in.LOVE with their beautiful fabrics at fabulous prices!
How to Make DIY Fabric Gift Tags
Want to make some Fabric Gift Tags to add a personal touch to the presents under your tree this year?
Follow these steps to make the one I made:
Materials:
1/4 yard of your favorite fabric
Card stock in your color of choice
Baker’s twine
Grommet and grommet tool (optional)
Mod Podge (I used the ‘Sparkle’ finish)
Fabric scissors (I use Fiskars)
Small brush
Tacky glue
Iron on vinyl (I used Cricut brand vinyl)
Hot glue gun (and glue stick)
Directions:
Step 1:
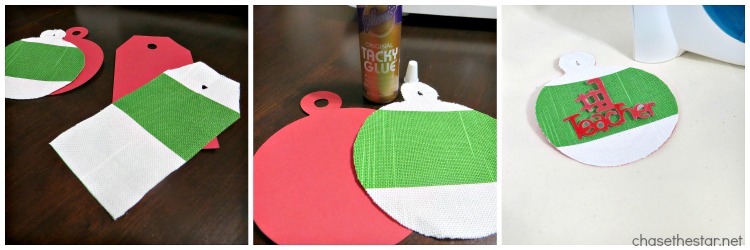
If you have a cutting machine like a Cricut, cut out label shapes on your card stock. If not, then you can cut the shapes out with your scissors (keep them simple like the circle and rectangles I used). Be sure to cut a hole at the top, where your twine will hang from.
Step 2:
Using the card stock as a guide, cut the fabric in the same shape.
Step 3:
Add a very light coat of the tacky glue on to the card stock and adhere the fabric onto it, making sure to smooth out any air bubbles. Allow that to dry for a couple of minutes.
Step 4:
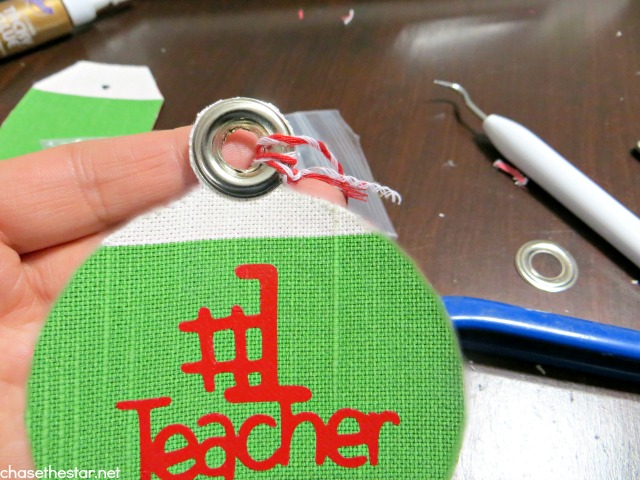
This step is optional, but it does add a nice polished touch to the tags…add a grommet to the top where the hole is (here’s a tutorial on how to use a grommet tool).
Step 5:
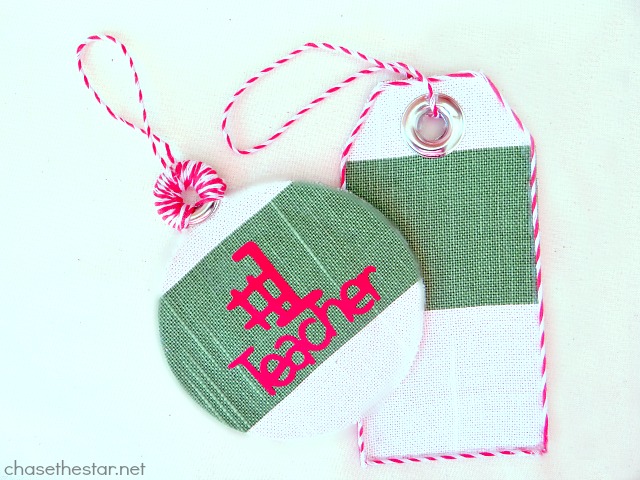
(Optional) On one of the gift tags I used iron-on vinyl to add a cute message, “#1 Teacher”.
(Here’s a simple tutorial on how to cut and apply iron-on vinyl)
Step 6:
Lastly, wrap some baker’s twine around the grommet, and tie a knot on either end. Secure with a little hot glue if necessary.
Step 7:
Lastly, flip the gift tag over and with a small brush, and a light hand, add a single coat of Mod Podge.

This will make it so that the card stock will hold up through time. On the square tag, I added baker’s twine along the edges too, just for fun! A small amount of hot glue all the way around will do the trick.
Notice many of the steps in these directions are ‘optional’. Truth is, you can get so creative with these DIY Fabric Gift Tags! Add some lightweight embellishments, ribbon, or anything you like!
These tags will be great any time of year too, think: Valentine’s Day gifts, to hang on Easter baskets, party favors, baby showers, you name it!
I LOVE working with fabric! Yes, the girl who can’t sew loves fabric! There is SO much more to do with quality fabric that doesn’t include a needle and thread.
Next week I will show you what we are making our (his) teacher for Christmas, another SUPER easy project! Don’t worry I’ll let you copy my work! :) What are your kids giving their teachers this year?
Meredith @ Wait Til Your Father Gets Home says
So cute and easy to make! I love the baker’s twine at the top too :)
Barbara @ Chase the Star says
Thank you!!! It’s going to school tomorrow!
Fabrics says
We’re same, I prefer the same way, indeed it is better than buying some because with it at least they will appreciate our efforts, as they said its not about how it cost you, its about the love and effort you’ve exerted while making it, thanks for sharing this DIY fabric gift tags, I’ll look forward to make some.
Kinda says
The Fabric Gift Tags are a great DIY project and so easy to do. Your directions are very clear and easy to understand. I am going to make them for my christmas gifts this year, but add Seashells to them.
Thank you for sharing, you have a great website.
Kinda
Barbara @ Chase the Star says
Thank you Kinda! Adding seashells sounds cute!